5. PyTorch scaling test
5.1. Scaling tests for PyTorch of ResNet152 on Imagenet
Author(s): Matteo Bunino (CERN), Jarl Sondre Sæther (CERN)
5.1.1. Introduction
This tutorial will show you an example of running a scalability test using the metrics
provided by the itwinai library. It will also show how itwinai’s distributed
strategies simplify the code for distributed training, and that the computational
overhead of these strategies is negligible, or even non-existent.
The tutorial uses the following three strategies for distributed machine learning:
PyTorch Distributed Data Parallel (DDP)
Horovod
Microsoft DeepSpeed
Each strategy is implemented both as a stand-alone implementation and as a part of the
itwinai_trainer.py script, the latter of which using the itwinai distributed
strategies. One particularly noticeable difference is how we are able to use a single
file for all the different strategies when using itwinai.
5.1.1.1. Dataset
This tutorial uses the ImageNet dataset to test the scalability of the different
strategies. The ImageNet dataset is very large and computationally demanding, taking a
long time to complete. Therefore, if you wish to only perform a quick test, you can
set the subset_size parameter in the config/base.yaml configuration file to only
train on a subset of the data. Through trial and error, we found that setting the
subset size to around 5000 works well for quick experimentation.
5.1.1.2. Scalability Metrics
The itwinai library offers multiple scalability metrics, but these require
the itwinai trainer, which is not used in this tutorial, and are therefore unavailable.
5.1.1.3. Configuration and argument parsing
Configuration files are stored in the config/ folder:
base.yamlprovides the configuration common to all training experiments.ddp.yamlprovides the configuration specific to DDP.horovod.yamlprovides the configuration specific to Horovod.deepspeed.yamlprovides the configuration specific to DeepSpeed.
Thanks to the itwinai.parser.ArgumentParser, the arguments can be parsed both from
the CLI itself as well as from an arbitrary number of configuration files.
Additionally, fields in the configuration files can be overridden in the CLI as needed.
Example:
# Rather than requiring a LONG list of inline configuration params...
python ddp_trainer.py --data-dir some/dir --log-int 10 --verbose --nworker 4 ...

# ...itwinai's ArgumentParser allows using a set of configuration files, with inline
# override if needed
python ddp_trainer.py -c config/base.yaml -c config/ddp.yaml --log-int 42
5.1.2. Run a single training
Training runs should be submitted using SLURM. To do this, you can use the provided
slurm.py file, which leverages the itwinai.slurm.SlurmScriptBuilder for automatic
SLURM script generation. The builder uses the slurm_config.yaml file for parameters,
meaning that you don’t have to add all your SLURM parameters inline. If you have
specified the parameters to your liking (e.g. how many GPUs to use, how long the
training should last etc.), you can run the SLURM script with the following command:
python slurm.py -c slurm_config.yaml
Running this command will submit the job and store the script to file. If you don’t
want the job to be submitted immediately, you could add --no-submit-job, allowing you
to inspect the saved file before running it. If you don’t want to store the script for
later use, then you can add --no-save-script. If you add both of these, the builder
will simply print the resulting script without running or saving it, allowing you to
quickly tinker with it before running it. An example of the full command with both
of these options looks like this:
python slurm.py -c slurm_config.yaml --no-save-script --no-submit-job
If you want to override any of the fields from the configuration file, you can add the argument inline after, like this:
python slurm.py -c slurm_config.yaml --no-save-script --no-submit-job --job-name my_job
Here, we overrode the job-name field with the value my_job.
5.1.3. Run all the distributed strategies
To run all the distributed strategies, e.g. DDP, Horovod and DeepSpeed, you can
use the mode argument with the runall option like so:
python slurm.py --mode runall
It is also possible to add a configuration file, but keep in mind that the runall
mode will override certain fields like the distributed strategy etc. Similar to before,
you can also print the scripts before choosing to run them. An example of running all
the distributed strategies with a configuration file where you print the scripts first
can be seen here:
python slurm.py -c slurm_config.yaml --no-save-script --no-submit-job --mode runall
5.1.4. Run scaling test
If you wish to run a scaling test, you can set the mode to scaling-test. This will
launch all the distributed strategies with different number of nodes. An example of
this can be seen here:
python slurm.py -c slurm_config.yaml --no-save-script --no-submit-job --mode scaling-test
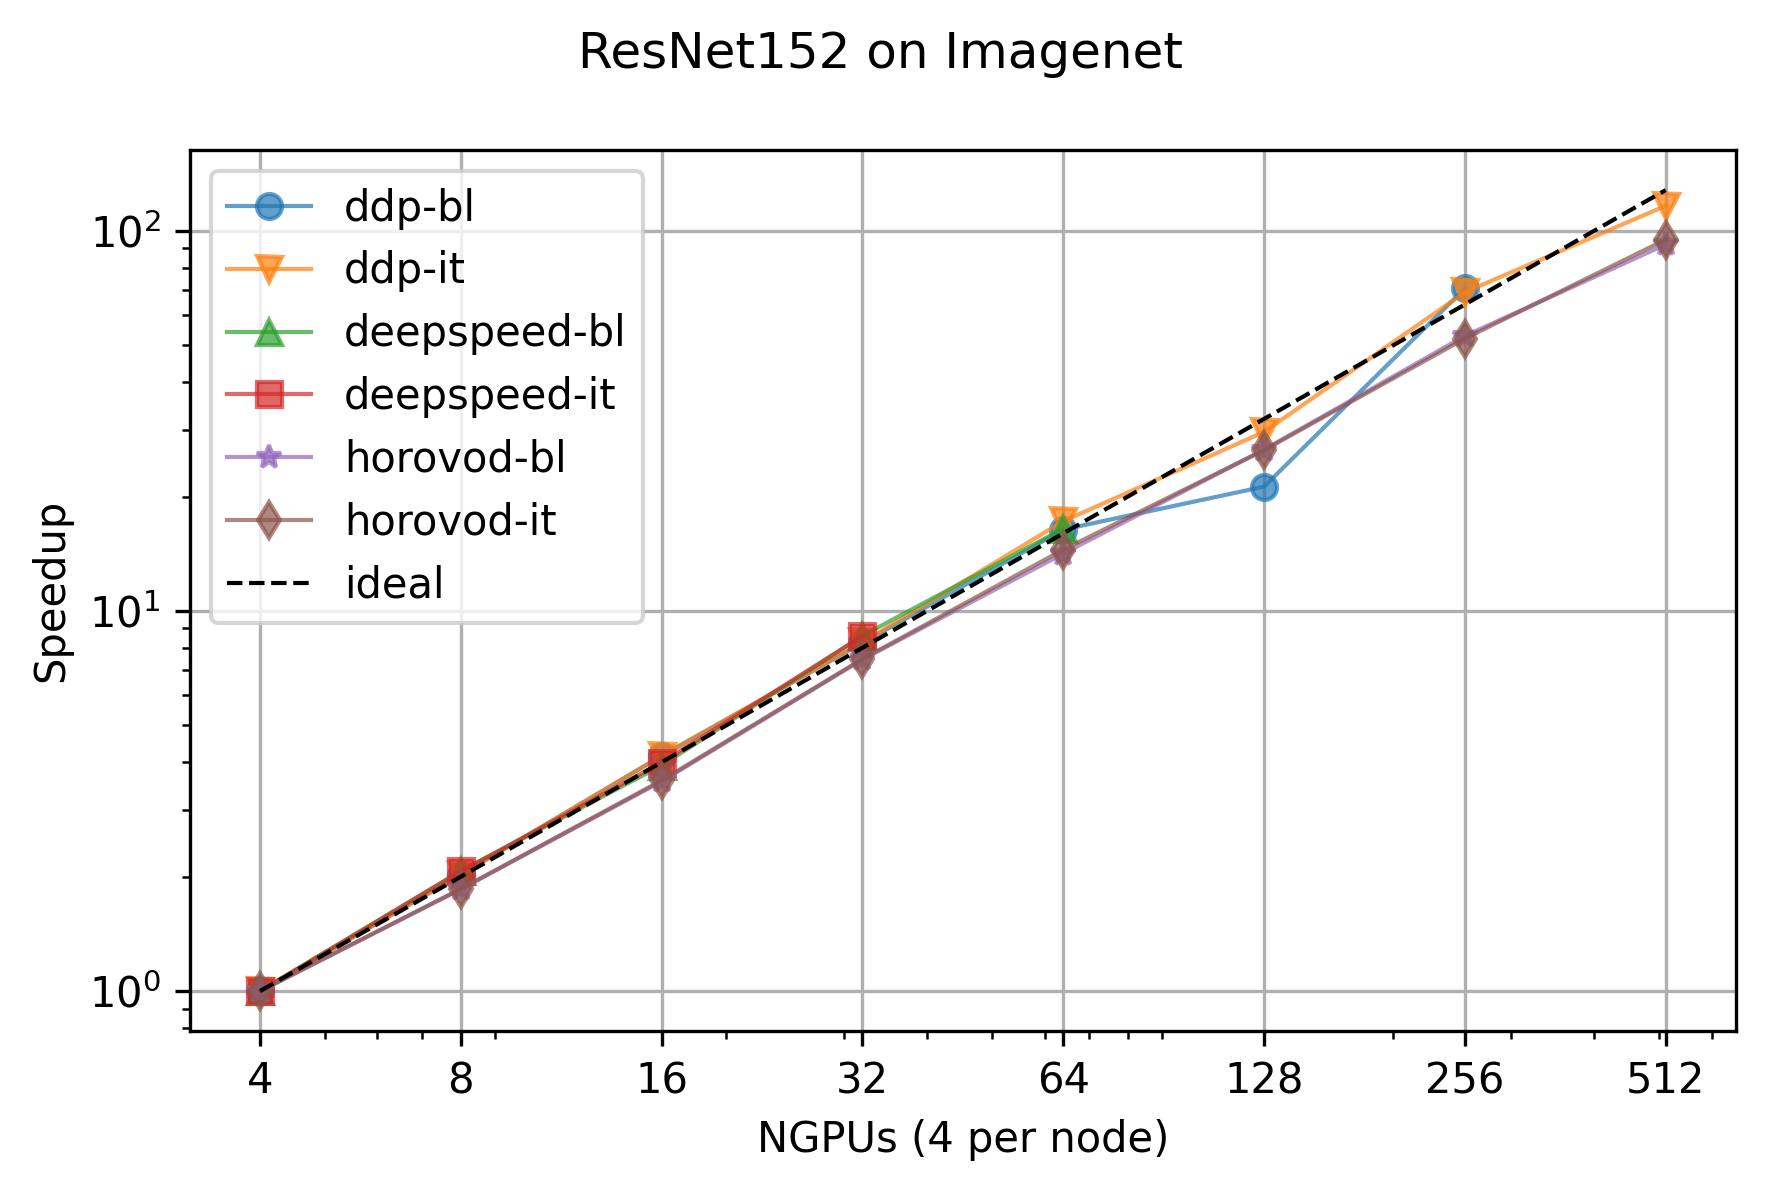
5.2. Plots of the scalability metrics
We have the following scalability metrics available:
Absolute wall-clock time comparison
Relative wall-clock time speedup
Computation vs. Other time
Communication vs. Computation time (deprecated)
GPU Utilization (%)
Power Consumption (Watt)
You can see example plots of these in the Virgo documentation or the EURAC documentation.
Additionally, we ran a larger scalability test with this tutorial on the full ImageNet dataset with the older script. This only shows the relative speedup and can be seen here: